Search This Blog

Wednesday 16 October 2019

Mixed Media Come Sail Away Card

I have wanted to use the Stampin’ Up! laser cut card as a stencil for ages. The ‘Sail Away Memories & More’ collection have a brilliant waves lazer cut card in this set and when I saw this challenge from TGIF, I decided today was the day!

The background is a mixed media style. I have coloured my textile paste with some coordinating dark blue ink and using a palette knife spread thinly over my Stampin’ Up! Smoky Slate base Cardstock. (Hint, do not leave the lazer cut card in place for too long, as pieces of it may stick to your design. If some pieces do stick, it is easier to remove them once the piece is completely dry. Speaking from experience, I will have to cover some places where I tried to remove the bits whilst still wet. As long as we don’t tell anybody then folk are non the wiser!) 

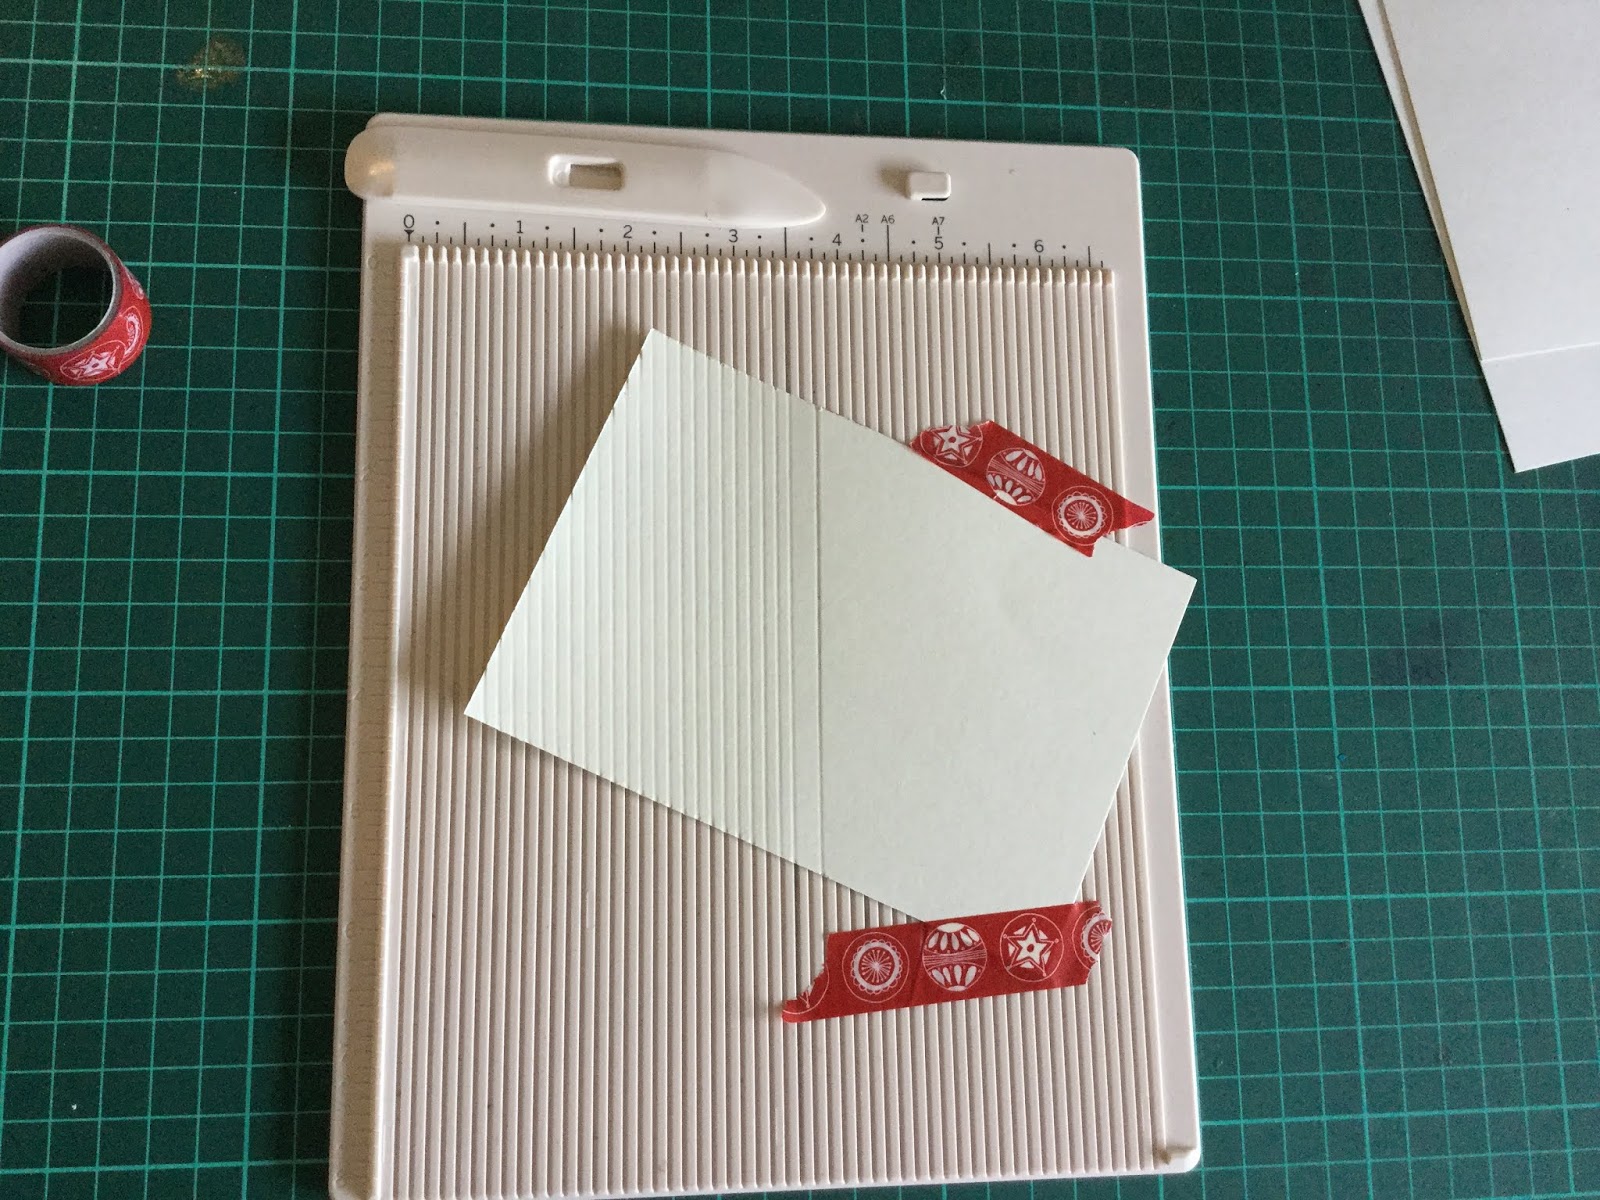
The piece of Sail Away lazer cut card kept in place with washi tape
A sprinkle of Brusho to the still damp texture paste

Deciding it needed just a little more detail, I have lightly sprinkled some Cobalt Blue Brusho colour onto the textile paste, whilst it was still damp. I didn’t want the Brusho to spread too much, just to moisten the dots, so I sprayed the water into the air and passed the Cardstock through the water vapour and repeated until I had the effect I liked.

The multi media Smoky Slate card, once dry, I then cut to even the edges and I  mounted it onto Stampin’ Up! Night of Navy Cardstock and a C6 white cardbase.
I have finished the card front off with the Stampin’ Up! Sailing Home stamps, & matching Smooth Sailing dies. I have Stamped the sentiment in Night of Navy, from Thoughtful Banners and added the die cut sentiment from well written dies.

Thank you for checking out my blog today! 


#TGIF233 Sketch Challenge

Tuesday 4 June 2019

Cat Photo Journal


To lose a family pet is hard and I have made this small photo journal to remember a very loved cat! The journal measures 7 1/2” x 5 1/2”, with the inside pages measuring 7” x 5” which makes them just the right size for 6” x 4” photographs, with a 1” spine.


Front of journal with a material spine binding 

For the first time I have used material on the spine of the album. Firstly I covered the spine with cardstock, then using wide double sided tape, I assembled the material in two layers.
Inside front cover with flap closed

I cut the material 4” longer than the spine to overlap,  cutting the material at a width of 3” x 11 1/2”.
The two material layers were stuck together with the tape to make a double layer, which was then adhered to the spine with more double sided tape. The length of material gives a  2” top & bottom overlap for inside the cover. Then both front and back covers were done separately, which I found easier than a full cover.
Inside back cover with the flap open

Inside front cover with the flap open


Apart from the cat paw print & fishbone, which are Kaisercraft Pawsome stamp set. The other images & sentiments have are digital.


Tuesday 21 May 2019

Simple Stamping with Stampin’ Up Eastern Beauty

I have been playing with the soon to retire Stampin’ Up products, Eastern Beauty stamp set and used the In Colour 2017-2019, also retiring. 
The card base used ‘Fresh Fig’ along with some matching DSP.


I have done some #simplestamping using all of the ink colours and am very happy with the result.
I hope you like it.


Saturday 27 April 2019

One Layer Card

I’ve not done any colouring for a little while and today a challenge came through from ‘Less is More!’ that sparked my interest. I hope you like it.


This minimal type of card takes a lot more effort than the end results would let you believe. It was coloured with alcohol markers.


Finding a suitable stamp meant I needed to play around with the image. I have used a freebie from a magazine that I’ve had for a few years now. It was a corner stamp and a bit too large, so out came the washi tape. I covered the area I did not want to use before inking. Speaking from experience, don’t forget to remove the washi tape before you stamp your image. I have used a stamp positioner, which helps you get just the result you want.


Thursday 18 April 2019

A Music Card

Sometimes it’s a bit hard to come up with cards that are suitable for the men in your life! This card was inspired by the Kaisercraft ‘Always & Forever’ paper pack. Having a musical paper that was coloured just seemed to work. I have used the Memory Box Musical Treble Clef die, along with stamps from a very old Inkadinkado set.


This is a 6 x 4 card, using a separate matching top layer. Working on the topper, I have cut a piece of Kaisercraft paper, firstly as 4 x 4 and then cutting it at an angle. Measuring 1 3/4” down one side of the music paper, and lining up with the opposite corner, cut the paper at an angle. Stick musical paper to your topper piece of card.


Using a Scoreboard, score immediately above the music paper line. Selecting your sentiments, stamp just above this score line. Score a second line above your sentiments.


Turn the paper over and the two existing score marks are now visible. Realign each score line and score again over the existing score lines. This reverses the score mark, making mountain score lines. 

I have used washi tape to make sure the paper in stays in place. Carefully continue to score across the remaining card towards the top, until the top section is all with mountain style score lines.


To finish the card, I have die cut two treble clefs and stuck them together, before sticking to the front of the card. The topper has then be attached with dimensionals for effect.

Saturday 13 April 2019

Nursery Shadow Box

I have been researching shadow boxes for a little while now. I think of this as the new style of craft, so instead of the needlework samplers, which I do so admire, we can have paper crafted ones instead!
I have used Stampin’ Up stamp & die sets, Sweet Storybook; Fable Friends & Animal Outing.
Well Written Framelit dies were used for the foliage, flowers bird & butterflies.


This sampler uses a deep shadow box measuring 9” x 9” I have added dimensions lastly for reference. The images have been hand coloured with Alchol markers and layered for effect. The plain card all uses the matching colours to Stampin’ Up Twinkle Twinkle dsp, which is the spotted back ground paper.
A space has been left at the top and is for my Grandaughters name & date of birth.


All measurements in inches.
Background 9 x 9
Two base rectangles 2 7/8 x 5 5/8
Two top rectangles 2 5/8 x 5 3/8
Two base squares 2 7/8 x 2 7/8
Two top squares 2 5/8 x 2 5/8 (using Stampin’ Up Stitched Shape Framelits largest die)


Tuesday 9 April 2019

Special Card

I was asked for a card for a 21st birthday, with the unusual colour of black! Luckily I had some black pearl card that went really well with Stampin’ Up Foil sheets in Lovely Lipstick.

This card is using a centre opening base, that has been die cut on the front making two front flaps. By using a larger detail die, the Foil sheet inside is visible through the gaps


The Foil sheet is added inside the black  card and is base opening, cut just fractionally smaller than the main black card base. The circular layer to the front, is stuck on only one side of the card, and doubles as holding the ribbon in place. 


After completing the card I decided to add 21 to the circular layer in black pearl card.

Wednesday 3 April 2019

Colour Challenge

A first for me is a colour challenge, with my favourite colours, how could I resist. 
The challenge is from ‘AUSSIES WHO LOVE STAMPIN’ UP’ so all the cardstock & supplies today are from Stampin’ Up.
I have layered Bermuda Bay cardstock onto a Coastal Cabana card base.
The next layer is Highland Heather cardstock and using the Botanical Bliss stamps, I have used the embossed resist technique. Stamping all Over with Versimark ink, before using heat embossing with clear embossing powder. 


I have added Pacific Point ink to the centre of each large flower, before 
blended the Gorgeous Grape over the entire image.  Once completely inked, I have gently rubbed a dry tissue over the cardstock layer, to reveal some of the Highland Heather colour where the clear embossing is.

Wanting a little more Highland Heather, I used a technique I CASED from GAIL ELLIS, Blue Rose Paper Treasures, where the top colour is lifted by Aqua Painter. Using aqua painter brush, which is damp, paint over the area you wish to expose, blot with dry tissue, repeat until you have desired colour effect.


Giving a two toned effect with the showing through, the card is completed in coordinating cardstock & Highland Heather ribbon.


Sunday 31 March 2019

Twins with Lili of the Valley

Today I wanted to create a card for the birth of twins. Now I only have stamps for one baby image and decided I just wanted something a little different.
I have ‘Lily of the Valley Baby Blanket’ stamp, which is a single image rubber stamp. After stamping onto cardstock, I have uploaded the image to my Serif  Craft Artist and played a little with the digital image.
Copying the image, I then reversed one of the images and joined them together to get the current image.
This has been coloured with Alcohol Markers, before the final layering onto Stampin’ Up Twinkle Twinkle designer series paper.


The inside has been coordinated with ‘Stampin’ Up First Steps’ stamp set. I have played around with the inside, so have included a photo.


Monday 21 January 2019

Berievement Card with Tropical Chic


I do tend to keep a little stock of cards for the odd occasions when somebody sadly has passed, as your creative mind does not always perform under such pressure. After my recent purchase from Stampin Up Tropical Chic, I suddenly noticed my quilt cover, inspiration comes from unusual sources!
I tried several options, but I really couldn’t get the colour. Will have to look into techniques on that one. I tried two different black backgrounds, one using white ink, the other using the Versimark & clear embossed.

I decided on the Versimark clear emboss background and I finished the card off with some stamping and die cutting from the Tropical Chic bundle.
I really loved the end result, I hope you do too!


Thursday 17 January 2019

Teenagers

Well cards for teens are certainly a bit more of a challenge and with this one, a lot of fiddling about ended in this result.


The card was representing an Akai midi, that I knew was a gift for this particular 16th Birthday. I was quite pleased with the keyboard, where I used the scoreboard on the edge of the keys, before cutting off a tiny triangle in each corner. It seemed  to make them stand out better!

It was quite a challenge to get the result that I wanted, but the new Stampin’ Up foil sheets helped achieve that end result of the backlit switches.


(Stampin’ Up foil sheets in Lovely Lipstick & Grapefruit Grove, Free for a limited time when you spend A$90)